Introduction to Christmas Cookie Icing Recipe
The joy of holiday baking and decorating cookies
When the holiday season approaches, the air fills with excitement, warmth, and a dash of nostalgia. There’s something enchanting about Christmas baking that brings people together. Families gather in the kitchen, laughter echoes, and the scent of cinnamon and sugar wafts through the house—creating a festive atmosphere that often feels like a scene straight from a holiday movie. But let’s be real: what makes those freshly baked cookies even more magical is the delicious icing that transforms them from tasty treats into edible works of art.
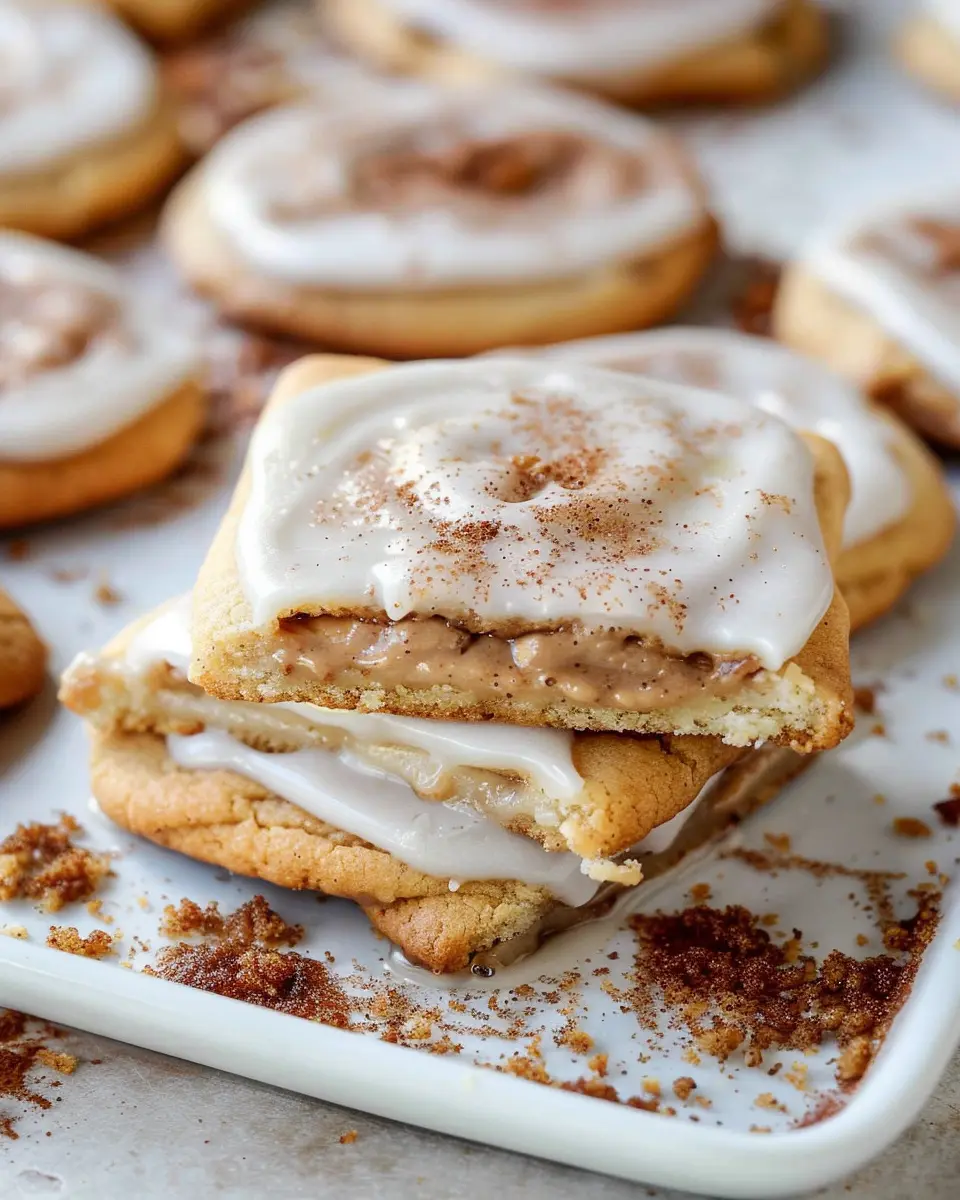
This isn’t just any icing; it’s what we call the Christmas Cookie Icing Recipe. A good icing can elevate your cookies to a new level, adding not just sweetness but also vibrant colors and fun patterns. Imagine spreading a glossy, royal icing over your snowflake cookies or piping bright red and green accents on gingerbread men. The creative possibilities are endless!
Did you know that decorating cookies can be therapeutic? According to a study by the University of Southern California, engaging in creative activities like baking can reduce stress and improve mood. So, not only are you creating something special for your loved ones, but you’re also taking care of your mental well-being while you do it. It’s a win-win!
In this article, we’ll dive into the Christmas Cookie Icing Recipe that will ensure your cookies stand out this holiday season. Whether you’re a seasoned pro or a newbie trying your hand at cookie decorating for the first time, this easy-to-follow icing recipe is perfect for all skill levels. Plus, the ingredients are simple and easy to find—think powdered sugar, egg whites, and a splash of vanilla extract.
As you prepare for your holiday baking adventures, take a moment to reflect on how sharing homemade cookies can create cherished memories, build connections, and spread joy. So grab your apron, and let’s turn those cookies into delightful masterpieces that friends and family will love. Your festive cookie decorating journey starts here!
For more inspiration, you might find this article on holiday baking ideas helpful as you get started.

Ingredients for Christmas Cookie Icing Recipe
Classic Sugar Cookie Ingredients
To craft the perfect base for your festive icing, you’ll need a delightful batch of classic sugar cookies. Here’s what you need:
- 2 ¾ cups all-purpose flour
- 1 teaspoon baking powder
- ¼ teaspoon salt
- 1 cup unsalted butter, softened
- 1 ½ cups granulated sugar
- 1 large egg
- 1 teaspoon vanilla extract
Combine these ingredients for a classic sugar cookie that pairs beautifully with any icing!
Essential Icing Ingredients
Now, let’s turn our attention to creating that beautiful icing. For your Christmas Cookie Icing Recipe, gather:
- 2 cups powdered sugar
- 2 tablespoons milk
- 1 tablespoon light corn syrup
- ½ teaspoon vanilla extract
- Food coloring (optional)
This combination will yield a smooth and glossy finish. Check out more icing techniques on Bakerella for inspiration!
Optional Decoration Elements
Want to make your cookies extra special? Consider these fun decoration options:
- Sprinkles or colored sugar
- Edible glitter
- Mini chocolate chips
- Candy canes, crushed
Using these optional elements allows you to personalize each cookie, making them as unique as your holiday celebrations! Remember, your imagination is the limit when it comes to decorations. Happy baking!
Step-by-Step Preparation for Christmas Cookie Icing Recipe
Christmas is the perfect time to indulge in baking, and nothing brings back the warmth of the holidays quite like cookies adorned with colorful icing. Follow this step-by-step guide, and you’ll be well on your way to creating the ultimate Christmas Cookie Icing Recipe, perfect for holiday gatherings or as heartfelt gifts.
Crafting the Perfect Cookie Dough
Let’s start with the foundation of your cookie masterpiece: the dough! You’ll need the following ingredients:
- 3 cups all-purpose flour
- 2 teaspoons baking powder
- 1 teaspoon salt
- 1 cup unsalted butter, softened
- 1 ½ cups granulated sugar
- 2 large eggs
- 2 teaspoons vanilla extract
-
Mix Dry Ingredients: In a medium bowl, combine the flour, baking powder, and salt. Whisk them together until they’re well blended. This helps ensure even distribution when you mix it into the wet ingredients.
-
Create the Wet Mixture: In a large bowl, cream together the softened butter and sugar until it’s light and fluffy. Then, beat in the eggs one at a time, followed by the vanilla extract. Look for a texture that feels smooth and creamy.
-
Combine Ingredients: Gradually add the flour mixture into your wet ingredients. Stir until everything is combined—don’t overmix, or your cookies might turn out tough!
Giving Your Dough a Chill
Now that you’ve got your cookie dough ready, it’s time for a little rest. Chilling the dough is crucial for achieving perfectly shaped cookies.
- Wrap and Chill: Form the dough into a disc, wrap it in plastic wrap, and refrigerate for at least 2 hours or overnight. This firming process not only makes it easier to roll out but also intensifies the flavors.
Why chill the dough? According to experts, chilling helps the gluten relax, preventing the cookies from spreading too much during baking. So trust the process!
Baking Straight to Perfection
Once your dough has chilled, it’s showtime! Let’s bake those cookies.
-
Preheat the Oven: Begin by preheating your oven to 350°F (175°C) while you prepare your baking sheets.
-
Roll and Cut: On a floured surface, roll out the dough to about 1/4-inch thick. Use your favorite cookie cutters to create festive shapes—stars, trees, and snowflakes make beautiful canvases for your icing skills!
-
Bake: Place the cookies on an ungreased baking sheet and bake for about 8-10 minutes. Watch them closely; they should be just turning golden at the edges.
Pro tip: Let them cool on the baking sheet for a few minutes before transferring to a wire rack. You’ll create the perfect base for your Christmas Cookie Icing Recipe, which we’ll get to next.
Creating a Colorful Icing
Once your cookies are cool, it’s time to prepare the icing. Here’s a basic royal icing recipe to get you started:
- 2 egg whites
- 3 cups powdered sugar
- 1 teaspoon lemon juice
-
Mix the Ingredients: In a mixing bowl, beat the egg whites until they are frothy. Gradually add the powdered sugar, mixing until the icing holds stiff peaks. Finally, blend in the lemon juice.
-
Color It Up: Divide the icing into separate bowls and add food coloring to each as desired. Gel food colorings work best for vibrant hues without thinning the icing.
-
Texture Check: You might want to thin a portion for flooding—simply add a few drops of water until you reach the desired consistency.
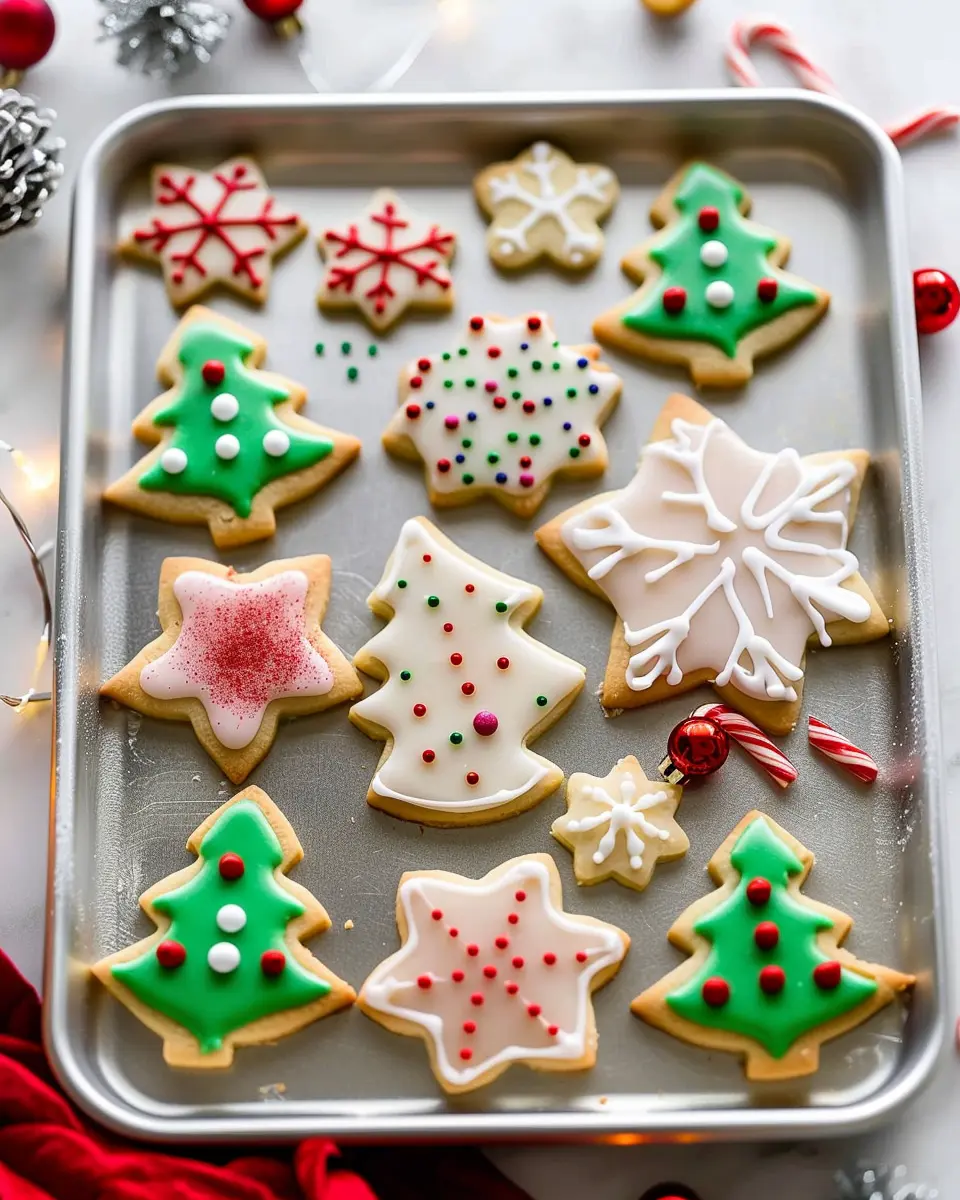
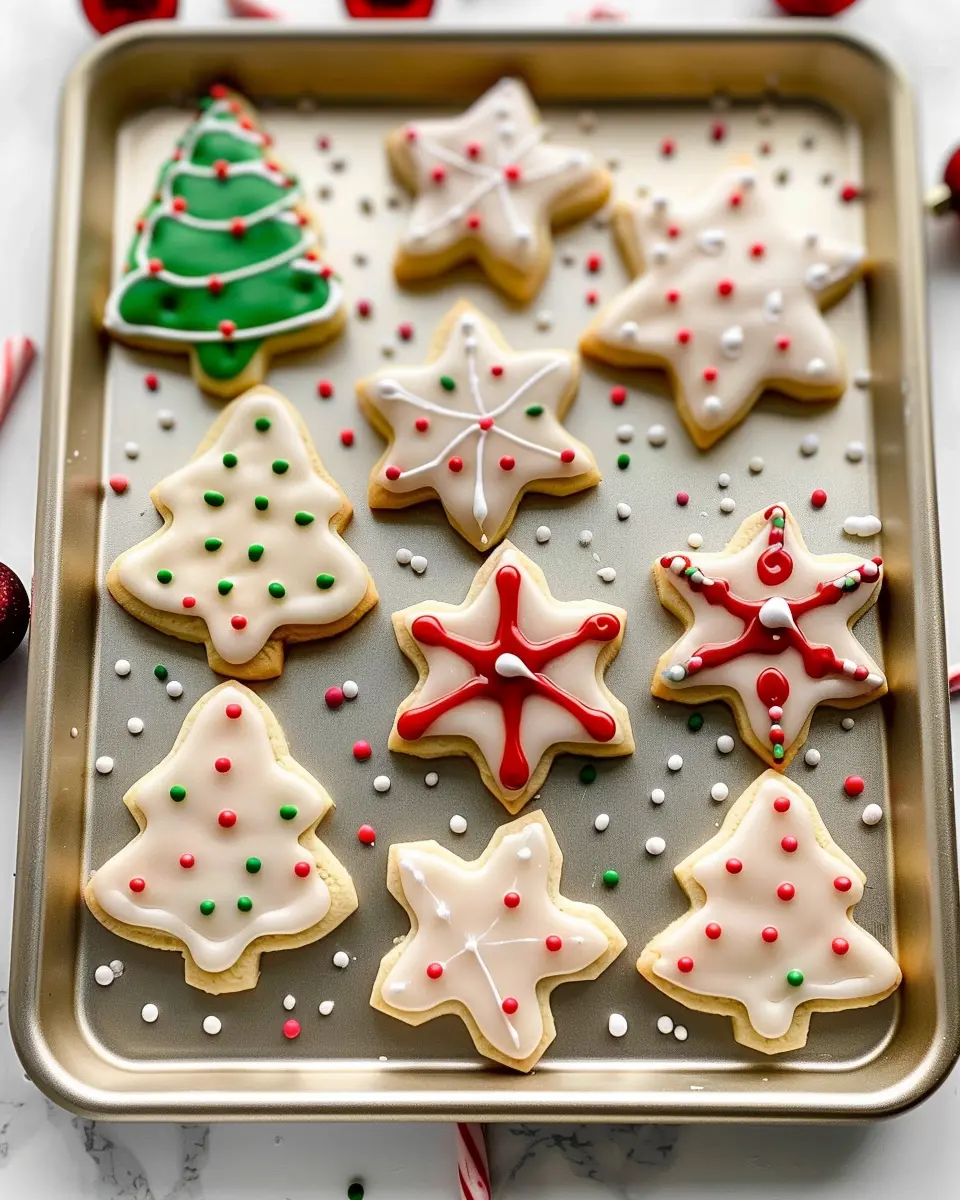
Adding the Finishing Touches
Now comes the fun part: decorating!
-
Outline Your Cookies: Use a piping bag with a small round tip to outline your designs. This creates a boundary for your flooding icing.
-
Flooding: After outlining, use a slightly thinned version of your icing to fill in the shapes. Don’t worry if it doesn’t look perfect right away—use a toothpick to smooth it out!
-
Let It Dry: Allow the decorated cookies to dry completely. This can take several hours or even overnight, depending on humidity.
Finally, remember to enjoy the fruits of your labor. These iced cookies make beautiful gifts or a delightful addition to any holiday celebration. And who knows, maybe you’ll start a new holiday tradition of cookie decorating with friends and family—what’s better than that?
For additional tips on decorating techniques, feel free to dive into resources from Food Network or Serious Eats. Happy baking!
Variations on Christmas Cookie Icing Recipe
Festive Flavor Variations for Cookies
When it comes to a Christmas Cookie Icing Recipe, there’s plenty of room for creativity! Why stick to plain vanilla when you can explore other delightful flavors? Here are a few suggestions to make your cookies extraordinary:
- Peppermint Extract: Just a few drops can give your icing a refreshing twist—perfect for the peppermint lovers in your life!
- Almond Extract: A lovely nutty flavor that pairs beautifully with vanilla. It’s like a surprise in every bite.
- Citrus Zest: Adding the zest of lemon or orange can brighten up your icing and add a refreshing tang.
These flavor enhancements are not only easy to incorporate but also sure to impress your friends and family.
Different Icing Colors and Techniques
Coloring your icing can turn a simple cookie into a masterpiece! Try these techniques to elevate your Christmas Cookie Icing Recipe:
- Pastel Shades: Mix in gel food coloring to create soft hues. Just remember, a little goes a long way!
- Ombre Effect: Gradually mix colors into your icing to create a beautiful gradient. Perfect for themed cookie platters!
- Sprinkle Jewels: Top your cookies with festive sprinkles or edible glitter. Not only does it add flair, but it also makes your cookies a feast for the eyes.
Thinking about how to make your cookies extra special? Check out resources like Taste of Home for inspiration. Remember, the joy is in the decorating as much as in the baking. So, get creative and let your personality shine through every sprinkle and swirl!
Cooking Tips and Notes for Christmas Cookie Icing Recipe
Best practices for cookie cutting and baking
When it comes to making perfect Christmas cookies, start with a solid dough. Use cold dough for easy cutting; this helps your cookies hold their shape during baking. Roll the dough to an even thickness (about 1/4 inch) for uniform baking. Preheat your oven properly and line your baking sheets with parchment paper to prevent sticking. Remember to cool your cookies completely before icing — this ensures the icing doesn’t melt.
Tips for achieving the perfect icing consistency
Achieving the right consistency for your Christmas Cookie Icing Recipe is crucial. You want it to flow smoothly but still hold its shape. A good rule of thumb is to add water gradually to royal icing until it reaches a “10-second” consistency — it should take about ten seconds for a drizzle to disappear back into the icing. If you’re unsure, check out detailed guides on icing consistency from reputable sources like The Kitchn.
With practice and patience, your cookies will not only taste great but also look festive and delightful!

Serving Suggestions for Christmas Cookies
Creative Presentation Ideas
When it comes to serving cookies, especially those adorned with your delightful Christmas Cookie Icing Recipe, let your creativity shine! Consider using:
- Festive Platters: Arrange your cookies in colorful holiday-themed platters, layered with parchment paper for a rustic touch.
- Gift Boxes: Package some cookies in cute boxes to share with friends or neighbors. A little note saying, “Happy Holidays from my kitchen to yours!” adds warmth.
- Glass Jars: Fill mason jars with a mix of cookies for a charming centerpiece that guests can nibble from.
Pairing Cookies with Beverages
To elevate your Christmas cookie experience, think about what to sip on while you indulge. Great non-alcoholic options include:
- Spiced Hot Chocolate: Rich and warming, it pairs perfectly with the sweetness of your cookies.
- Peppermint Tea: Offers a refreshing contrast and adds a festive flair.
- Apple Cider: Warm apple cider, especially if spiced, complements both the cookies and the holiday spirit beautifully.
Creating these little moments with friends and family makes your holiday gatherings all the more special! For more serving ideas, check out The Kitchn’s cookie serving tips.
Time Breakdown for Christmas Cookie Icing Recipe
When it comes to creating the perfect holiday treats, knowing the time commitment for your Christmas Cookie Icing Recipe is essential! Here’s a handy guide to help you streamline your baking process.
Preparation time
Getting your ingredients and tools ready will take approximately 15 minutes. Make sure your workspace is prepped for a fun baking experience!
Chill time
Allow the icing to chill for at least 30 minutes. This helps achieve the right consistency, making your decorating phase smoother and more enjoyable.
Baking time
For the cookies, set aside about 10-12 minutes. Keep an eye on them; you want lightly golden edges for the perfect texture.
Decorating time
Once the cookies are cool, the decorating should take around 20-30 minutes. Take your time to express your creativity!
Total time
In total, you’re looking at about 1.5 to 2 hours from start to finish. Enjoy the process, and become the holiday hero in your kitchen!
For a more detailed look at decorating techniques, check this resource to elevate your skills. Happy baking!
Nutritional Facts for Christmas Cookie Icing Recipe
When it comes to decorating your festive treats, understanding the nutritional facts of your icing can make all the difference! Here’s what you need to know about the Christmas Cookie Icing Recipe you’ll be using:
Calories
On average, a serving of this icing contains about 50 calories. While these tiny dollops of sweetness might not seem like much individually, they can add up quickly, especially if you’re dressing up multiple cookies!
Sugar Content
This recipe typically packs around 12 grams of sugar per serving. With the holiday season’s focus on sweets, it’s essential to keep an eye on sugar intake, especially for those watching their health.
Tips for Healthier Alternatives
If you’re looking to lighten things up a bit, consider these substitutions:
- Use Stevia or Erythritol: These natural sweeteners can reduce sugar content significantly without compromising taste.
- Greek Yogurt: Mix a bit of low-fat Greek yogurt into your icing for added creaminess while reducing sugar.
- Fruit Purees: Incorporate pureed fruits for sweetness and flavor – try bananas or apple sauce as natural alternatives.
For more tips on healthy baking, check out sources like Healthline or the American Heart Association. Happy decorating!
FAQ about Christmas Cookie Icing Recipe
As you gear up for the holiday baking season, it’s natural to have questions about the best ways to care for your festive creations. Here’s a friendly FAQ section addressing common queries related to our Christmas Cookie Icing Recipe.
How long do the cookies and icing keep?
Once decorated, your cookies will typically stay fresh for about 1-2 weeks when stored in an airtight container at room temperature. If you’re using royal icing, the cookies can retain their beautiful designs and flavors longer. Always ensure they are kept away from humidity, as this can affect the icing’s texture.
Can I freeze the cookies?
Absolutely! Freezing your Christmas cookies is a great way to manage holiday preparations. Once your cookies are completely cooled and iced, place them in a single layer on a baking sheet to freeze for a few hours. After they’re frozen, transfer them to an airtight container with parchment paper between layers to prevent sticking. They can last up to 3 months in the freezer!
What if I want to make them gluten-free?
Going gluten-free is simpler than you might think! Substitute traditional flour with a 1:1 gluten-free baking blend. Make sure to check that all other ingredients, like baking powder and icing sugar, are certified gluten-free to avoid cross-contamination.
Can I use powdered sugar instead of granulated sugar for the icing?
Great question! While powdered sugar can give your icing a smoother texture, it’s best used when making royal icing or glaze. For standard icing, granulated sugar will give you the right consistency for spreading or piping. Just remember to sift it, ensuring there are no lumps.
For additional insights on holiday baking and cookie decorating techniques, be sure to explore baking communities or check out expert advice from America’s Test Kitchen. Happy decorating!
Conclusion on Christmas Cookie Icing Recipe
Recap of the Joy of Homemade Cookies
There’s something magical about the aroma of freshly baked cookies wafting through your home during the holiday season. Using this Christmas Cookie Icing Recipe, you can transform your treats into festive delights. Remember, each cookie tells a story—whether it’s the sprinkles of joy or the heartfelt icing designs that you create.
Encourage Sharing and Enjoying
As you wrap up your baking adventures, don’t forget to share these delightful cookies with your loved ones. Baking is about connection, so why not host a cookie exchange or simply enjoy them at holiday gatherings? You might just create lasting memories while indulging in sweet moments together. Happy baking, and may your holidays be filled with love and laughter!
For more inspiration, you can explore cookie decorating ideas on Taste of Home or get festive ideas at Martha Stewart.
PrintChristmas Cookie Icing Recipe: Easy Tips for Festive Flavors

This Christmas Cookie Icing Recipe is perfect for adding festive flavors to your holiday treats.
- Prep Time: 10 minutes
- Total Time: 10 minutes
- Yield: 2 cups of icing 1x
- Category: Desserts
- Method: Mixing
- Cuisine: American
Ingredients
- 2 cups powdered sugar
- 2 tablespoons milk
- 1 teaspoon vanilla extract
- food coloring (optional)
Instructions
- In a mixing bowl, combine the powdered sugar and milk until smooth.
- Add vanilla extract and mix well.
- If using, add food coloring to achieve desired color.
- Use immediately to decorate cookies or store for later use.
Notes
- Adjust the consistency by adding more sugar for thicker icing or more milk for thinner icing.
Nutrition
- Serving Size: 1 tablespoon
- Calories: 30
- Sugar: 7g
- Sodium: 1mg
- Fat: 0g
- Saturated Fat: 0g
- Unsaturated Fat: 0g
- Trans Fat: 0g
- Carbohydrates: 8g
- Fiber: 0g
- Protein: 0g
- Cholesterol: 0mg
Keywords: Christmas, cookies, icing, recipe, festive flavors